The following techniques have been forwarded to me for posting. Please note these are "Unofficial" in nature, but are nevertheless a valuable insight. Feel free to make a contribution to this page. |
| ECAM Procedures ... Contributor: Dr. ECAM |
| DOCTOR ECAM There has been wide-spread discussion regarding ECAM…how to run it, why there is not more direction from the company/training department, etc. Hopefully, the following treatise will make you an expert in ECAM. First, we need to put to rest some misconceptions and clear up some gray areas. One area that needs to be addressed is that of landing distance. Look in your QRH, page A320 Perf-2. You’ll see “LANDING DISTANCE WITHOUT AUTOBRAKE”. This is the chart you’ll use in the simulator…(or similar charts for the 319/321). Point number one is that, if the autobrake is available for your landing, USE IT!!!!! (Even though the chart says ‘WITHOUT AUTOBRAKE’) Second, the distance you obtain from the chart is the actual distance required to stop the aircraft. If, after going through the chart, you determine you need 7000 feet of runway…and the runway you decide to land on is 7013 feet…assuming you do everything exactly right…you’ll stop the aircraft exactly 13 feet short of the runway’s end. “Everything exactly right” is defined as ‘on speed’, crossing the runway threshold at approximately 50 feet, minimal flare, touchdown on the thousand foot marks, and maximum braking. You have NO SAFETY MARGIN! Keep this in mind when you’re selecting your landing airport and landing runway. A second area of misconception that needs to be discussed is that of ‘Chapter 21’. Our procedure…and what we’re taught…is to run the ECAM procedures, and, when time permits, refer to Chapter 21. More emphasis needs to be placed on this. In fact, the procedure should be changed to: “After ECAM actions are completed, refer to Chapter 21”. (Not, when you can, or if possible, or if you want to, or it’s a good idea to…) There are a couple reasons for this. First, let’s assume you’ve pushed back from the gate, started engines, and begun your taxi. Halfway to the departure runway, you get an ECAM. You stop, advise ground control, run the ECAM (satisfying all the ECAM directives), continue your taxi…and take off. Out of 10,000 feet (after things have settled down), you decide to refer to Chapter 21. Oh no!!! Chapter 21 tells you not to take off. (ECAM made no mention of this little detail.) (In fact, anytime you get an ECAM while taxiing out for take off, assume you can’t take off. Check Chapter 21 first! Also, see FOM Page 5-36, Section 5.4.3 dated 27 JUN 03.) A second example is in the case of ‘SMOKE/AVNCS SMOKE” or “SMOKE/TOXIC FUMES REMOVAL”. In these instances, Chapter 21 either duplicates the QRH, or refers you directly to the QRH. In either case, ECAM doesn’t do a whole lot for you. Also, a good rule of thumb is: If it’s not in Chapter 21, go to your QRH. Or, take yet another example: HYD G RSVR LO AIR PR/OVHT/LO LVL. For RSVR OVHT or LO LVL, ECAM says: GREEN ENG 1 PUMP … OFF (end of story…) But, if you’ll look up that same procedure in Chapter 21, you’ll see an additional step to be accomplished: PTU … OFF. ECAM won’t say to do this PTU step, but it’s critical. Otherwise, the PTU will overheat, AND the Yellow system fluid will also overheat. By the way, another ‘Gotcha’ is when ECAM directs you to recycle flaps. BE SURE TO CHECK YOUR SPEED BEFORE CHANGING FLAPS. (Neither Chapter 21 nor ECAM warns you of this.) An argument could be made that, in the case of ANY ECAM, just get out Chapter 21, and run the procedures from there. How could you go wrong??? That’s well and good…except it’s not our procedure! A third area that needs to be discussed is that of “LAND ASAP”. ECAM displays this either in red or amber. One opinion out there on the line is that, if it’s in red, you need to land as soon as possible…nearest suitable airport (however that’s defined???). And, if the ECAM displays “LAND ASAP” in amber, the captain has a little more discretion in the decision of when and where to land. Unfortunately, our FOM has different ideas. Section 7.19, page 7-40 (page date: 27 SEP 02) makes no differentiation for the Airbus ECAM red and amber displays. The first sentence on this page states, “The FAA does not define suitable airport in this context” [the context being…an emergency or non-normal]. The text goes on to say, “The captain and dispatcher determine suitability based on all factors relevant to the situation”. The FOM lists eight factors you and the dispatcher should consider in making this decision. You should read this section of the FOM and use your own judgment regarding how to apply ECAM’s red and amber “LAND ASAP”. Another area of confusion is the ‘Command-Response-Response’ drill as prescribed in the FOM. As an example, ECAM directs: “Blue Electric Pump – OFF”. The PM, usually the captain, will read, “Blue Electric Pump – OFF.” He/she will then select the pump to ‘Off’ and will repeat the response “OFF”. We’re pretty much squared away with this drill. But, where the problem comes into play is with actions associated with a Thrust Lever, Engine Master, IDG, and Engine Fire Pb. In these cases, an incorrect action could have fatal consequences. So, we treat them in this fashion: The PM (again, usually the captain) states, “THRUST LEVER NUMBER ONE – IDLE”. The PF guards the number two thrust lever and states, “CONFIRMED.” Then, the PM moves the thrust lever number one to idle and states, “IDLE.” Similarly, ECAM directs that the number one engine master switch be selected to ‘Off’. The PM states, “Engine Master Number One – OFF.” The PF guards the number two engine master switch and states, “CONFIRMED.” Then, the PM selects the number one engine master switch to off and states, “OFF.” Again, this particular drill applies to these four actions: Thrust Lever, Engine Master, Engine Fire Pb, and IDG. A fifth area that needs to be addressed is that of an overweight landing as a result of a non-normal. We take off, have an engine failure right after V1, handle it like a pro, do the ECAM drill, refer to Chapter 21, get all set for a return-to-field landing…But, you’re above the max landing weight. Nowhere in the ECAM or Chapter 21 is there a directive to refer to the QRH for an overweight landing. Granted, you may not be able to satisfy all the items in the QRH’s OVERWEIGHT LANDING Procedure (depending on the non-normal). But, at least you get some guidance. Sixth, Dr. ECAM would like to clarify the ‘DOTS’ and ‘SQUARES’ in Chapter 21. The square blocks are used when there is more than one procedure under the same title. Example: ENG 1(2) FAIL You’ll have a square block under this title delineating “Before Takeoff or After Landing”. And, you’ll have a square block for “Inflight”. You’ll execute either one procedure OR the other. However, both procedures are under the same title, i.e. ENG 1(2) FAIL. The dot is used when there is a precondition. For example: ENG 1(2) FAIL You’ll see a black dot for “If Damage” and a black dot for “If No Damage”. You see…a precondition. There is one last item to discuss before we get into the meat of running ECAM. As with normal checklists, it is important that ECAM be run without interruption. Of course, in practice, a lot is going on, and there will be times when you need to stop what you’re doing for a minute or two. In these situations, it’s important to be disciplined. This means the PF commands ‘HOLD ECAM’. When ready to continue the checklist, the PF commands “CONTINUE ECAM’. Note, it’s the PF, not the PM. If the PM has to stop for whatever reason, he’ll/she’ll ask, “Hold ECAM?” The PF will reply, “Hold ECAM.” When ready to continue with the ECAM actions, the PM will ask, “Continue ECAM?” The PF will reply, “Continue ECAM.” This insures that the PF stays in the loop. Now to the ECAM. The first person to notice an ECAM reads it. For example: “AIR PACK ONE FAULT”. As we all know, the first rule and the last rule is to fly the aircraft, fly the aircraft, fly the aircraft. WHEN the flight path and configuration are properly established, AND WHEN you’re not in a critical stage of flight, AND WHEN you are at least 1000 feet A.G.L. (or OCA…whichever is higher), THEN the captain normally assigns the flying duties to the first officer…and the ECAM drill begins. This does not preclude canceling an audio warning by pressing the Master Warning Button when BOTH pilots are aware of the message. When transferring of control of the aircraft, be explicit. “YOU’VE GOT THE AIRCRAFT” … “I’VE GOT THE AIRCRAFT”. Not ‘You got it’, or ‘Take it’. When the first officer is squared away and comfortable in flying the aircraft, he’ll state “ECAM ACTION”. (Again, be explicit.) There is no reason to be in such a hurry to execute ECAM actions that the control of the aircraft suffers. Never…Ever!!! The captain, then, starts with the left side of the E/WD, reading the FIRST UNDERLINED FAULT. (There may very well be more than one underlined fault. We handle one fault at a time.) He/she reads the fault AND confirms the system fault on the S/D. The system of the top underlined fault automatically is displayed on the S/D. The captain will make a brief description of the fault to the first officer. The captain runs the Challenge-Response-Response drill as described earlier. This applies to the ‘Blue Items’ associated with that fault. As each blue item is accomplished, it will disappear. Depending on the fault, there may be no blue items. In that case, the captain merely reads the fault, confirms and verbalizes the fault on the S/D, and then states, “CLEAR ECAM?” (More on that, later.) Or, a blue item may be listed, such as “ATC ADVISE”. The aircraft’s ECAM system doesn’t know that you’ve advised ATC. So, that blue item will not disappear when you key the mic button. Or, another example of a blue item that doesn’t require a specific action is: “IF REV UNLOCKED AND IF BUFFET: MAX SPEED … 240 KTS”. Simply read that blue line item and go on to the next blue item. Again, some blue items might not apply. Another example, for ENG FAIL 1(2), you’ll see “If Damage” and “If No Damage”. One will apply; one will not. When ALL blue items FOR THAT FAULT are accomplished, the captain will ask, “CLEAR ECAM?” Always be sure that all blue items that can be eliminated, are eliminated. Then, after the first officer has confirmed that all blue items for that fault have been satisfied, he/she will state, “CLEAR ECAM”. At this point in this treatise, I need to mention that you may see, under the underlined fault, a ‘boxed’ item. In most cases, this simply means that the fault you’re dealing with has caused a problem in a secondary system. Example: The underlined fault is HYD B RSVR OVHT. Then, underneath this underlined fault is a boxed item that says, ‘B SYS LO PR’. If you’ll look to the right, you’ll see an asterisked item *F/CTL. ECAM is simply telling you that, because of your blue system overheat, your flight controls are affected. In one other case, though, you’ll have a boxed item that says, “SHUT DOWN”. This is associated with an engine fire or an engine failure that can’t/shouldn’t be relit. It’s telling you that you’ll have to execute the SHUT DOWN procedure. In any case, when you see a boxed item, don’t stop and treat it as a separate fault. Read through it and move on. Now, the captain goes on to the next underlined fault and treats it just as he/she treated the first fault. As he/she goes on to the next underlined fault, the S/D automatically follows with a system schematic and a depiction of that fault. One other point to mention, as an example in the case of an ENG FIRE fault, as you work through the blue items, the whole fault may disappear. This means the fire is out. For example, you do the first blue item… THR LEVER (affected) …………….. IDLE. Then, you do the second blue item… ENG MASTER (affected) ……………. OFF. Then, the whole fault disappears. That’s because the fire went out after shutting the engine master off. AFTER ALL FAULTS HAVE BEEN ADDRESSED, the captain will move his/her attention to the right side of the E/WD. This area shows secondary failures, and there may very well be more than one secondary failure listed. The captain will verbalize the first secondary failure, note the affected system on the S/D (Yes, ECAM now automatically displays that system schematic on the S/D.), discuss how that system is affected, and states, “CLEAR FLIGHT CONTROLS?” …or … “CLEAR ELECTRIC?” … or whatever. The first officer, upon being satisfied with the description of what’s failed, will respond, “CLEAR FLIGHT CONTROLS”. As the captain hits the ‘clear’ button, the S/D automatically shifts to the schematic for the next system that has a secondary failure. Do this drill until only green memos remain (if there are any green memos) … or, you may see a big red or amber “LAND ASAP”. The captain reads the memos or LAND ASAP (as applicable) to the first officer. There may be a green arrow. This means there are more memos to be read. To access these, simply hit “CLR” to scroll down. Next, the PM will move his/her attention to the left side of the S/D. Here are referenced limitations, approach procedures…or, other procedures such as “L/G…Gravity Extend”, or “GPWS FLAP MODE…OFF”. (Note: If ‘other procedures’ are referenced in this section, generally, you can find the procedure in the QRH. Otherwise, you’d see it on ECAM to begin with. Again, if in doubt, Chapter 21 will direct you to the QRH as necessary.) In this section (the left side of the S/D) you may also see “LDG DIST PROC … APPLY”. Here is how you do that: In the QRH ALPHABETIC INDEX (in the front), under ‘Miscellaneous’, you’ll see “Landing Configuration, Approach Speed, and Landing Distance Corrections for Failures” for the A319/A320/A321. For the A320 (for the simulator), it’ll be QRH page 51. On this page, find the appropriate equipment failure(s) and the FLAP LEVER POSITION (not necessarily actual flap position). From this, note the speed increment additive(s) and the landing distance multiplier(s). If you have multiple failures, you’ll have several additives/multipliers. And, UNLESS ALL THE ADDITIVES/MULTIPLIERS HAVE AN ASTERISK, YOU’LL NEED TO COMBINE ALL THE MULTIPLIERS. (If you’re confused with this, QRH page 53 explains it all.) If ALL the multipliers have an asterisk, use just the highest landing distance factor, i.e. don’t multiply the multipliers. Similarly, the airspeed ADDITIVES (not multipliers) are ADDED UNLESS ALL faults have the asterisk. IF ALL FAULTS HAVE THE ASTERISK, WE TAKE ONLY THE HIGHEST OF THE SPEED CORRECTIONS AND USE THAT FIGURE. In short, we ADD speed, MULTIPLY landing distance corrections. All speed increments are added unless all faults have the asterisk. If all faults have an asterisk, we take the highest additive and use only that. With landing distance, we multiply the multipliers, unless all faults have an asterisk. If all faults have an asterisk, we take only the highest multiplier…and use that in our calculations. Again, QRH page 53 explains all this. You’ll need to jot these figures down and go to the PERFORMANCE section of the QRH. (Example: A320 Perf-2. Again, the instructions on page 53 tell you to do this.) You’ll want the page entitled “LANDING DISTANCE WITHOUT AUTOBRAKE”. Note: You’ll always use the Configuration Full table, even if you’re landing with a flap setting other than config full. Also, as stated previously, even though the chart says ‘WITHOUT AUTOBRAKE’, use the autobrake if it’s available. Find the landing distance from the “LANDING DISTANCE WITHOUT AUTOBRAKE” chart, THEN apply your landing distance multiplier that you got from QRH page 51 (for the A320). Keep in mind, this is the actual landing distance for a perfectly flown approach, crossing the threshold at approximately 50 feet on speed, minimal flare, touchdown on the 1000 foot marks, and maximum braking. (No safety margin…no FAR Part 121 buffers. See POH page 21-3, section 21.1.3.) You’re almost finished. Last, go to QRH page 56 (for the A320) and look at the bottom half of the page where it says “A320 ABNORMAL/EMERGENCY CONFIGURATION (failure)”. (Again, the instructions on QRH page 53 tell you to do all this.) From this chart, you’ll obtain your approach speed. You will put this figure in the MCDU PERF page, LSK 5L. YOU’LL PUT THE SPEED IN THE MCDU AS A REMINDER ONLY, BECAUSE YOU’LL FLY THE APPROACH IN SELECTED SPEED, NOT MANAGED SPEED. NEVER FLY THE APPROACH IN MANAGED SPEED WHEN A NON-NORMAL DICTATES THAT SPEED INCREMENTS BE APPLIED!) Take your time with this section of the S/D. It’s okay to treat one line at a time, or read through all items listed on the left side of the S/D, then go back and treat them individually. Remember, however, that anytime you pause in the checklist flow, the PF needs to be told of this. The captain asks, “Hold ECAM?” And the first officer will state “Hold ECAM”. Continuing…”Continue ECAM?” And the first officer will state, “Continue ECAM.” This maintains both pilots in the checklist loop. An example of “Hold ECAM?” is when the captain does the LDG DIST PROC calculations. Next, the captain will go to the right side of the S/D. Here are shown all the inoperative systems. The captain will read to the first officer in a slow and deliberate manner each inoperative system. When this has been completed and the first officer understands what he/she has heard, the captain will ask, “Clear Status?” The first officer will reply, “Clear Status.” Continuing, the captain goes to Chapter 21 in the POH. Here, detailed information can be reviewed with the first officer. Last, and this is where he/she demonstrates his/her leadership skills, the captain will consult with the first officer, ATC, perhaps the flight attendants, the dispatcher, maintenance control…each entity as applicable…to determine a plan of action. What to do and how to do it… Once the captain formulates a plan, he/she will: Advise ATC, Advise company, Advise flight attendants, and Advise the passengers. “Advise, Advise, Advise, Advise!” That’s about it. Now you have your PhD in ECAM. One last word of advice: Follow the procedures to the letter. Don’t get creative. Don’t pull circuit breakers unless the procedure tells you to do so. You’ll likely compound the problem. Good luck and happy flying. You’re flying the most technologically advanced airliner in the world. Is this great or what!!!! |
| "200 NM TRAP" = CRUISE DESCENT ... Contributor: Captain Anonymous |
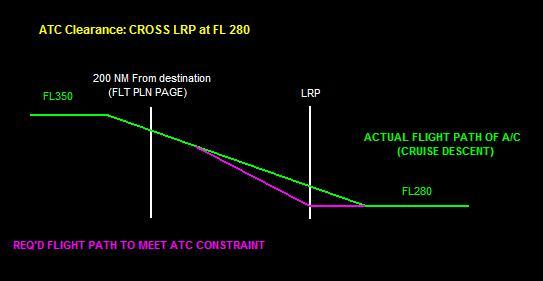 AT FL350 AND > 200 NM from destination (FLT PLN PAGE), ATC clearance: CROSS LRP AT FL 280. 1). Constraint entered on right side of FLT PLAN page (Vertical Constaints) as: “/280” 2). FCU Altitude set at FL 280 – DESCENT ENGAGE A/C enters a “CRUISE DESCENT” to FL 280 and WILL NOT HONOR constraint entered at LRP Indications are: 1). White message in MCDU Scratchpad – CONSTRAINT DELETED ABOVE CRUISE FLIGHT LEVEL: FL 2). CLR the Scratchpad – MESSAGE : NEW CRUISE ALT - FL280 3). FMA Indications: DES 4). PFD Indications - magenta “Target Airspeed” (Cruise Speed) No magenta Profile Deviation Indicator (Doughnut) 5). MCDU Indications – PERF Page – Title “CRZ’ in green (Active Phase) PROG PAGE – Title “CRZ” in green (Active Phase) CRZ ALT – FL280 and NO Vertical Deviation Information 6). Notice where level-off arrow (blue hockey stick) is in relation to waypoint with constraint given by ATC 7). If level-off is past waypoint then you must “V/S” or “OPEN DESCENT – SELECT” in order to comply with clearance If clearance received just prior to crossing 200 NM point, once inside of 200 NM a Managed Descent can be re-established by: 1). On PROG page enter an altitude in the CRZ field that is “ABOVE” you (example: FL370) 2). Watch FMA to change from “DES” to present “V/S” 3). Now re-enter constraint on FLT PLN page (LRP @ /FL280) 4). Re-engage “DES” (Managed Descent) 5). FMA indications: “DES” 6). PFD indications: Managed Speed “window" indicating SPEED Vertical Deviation Information (magenta doughnut) 7). MCDU Indications: PERF Page – “DES” in green (Active Phase) PROG Page – “DES” in green (Active Phase) No Cruise Altitude in CRZ FL Vertical Deviation Indication (Example: -1580’) 8). Look for Profile Capture Point (blue lightning bolt ) on NAV Display and blue Level-Off Point at or prior to waypoint
|
Technique: Thrust Levers at Landing ... Contributors: Anonymous |
|
Contributor 1:
* Our pilots handbook does NOT say to retard
at 50 feet, contrary to popular belief. It clearly says over the runway
threshold. (which is "about" 50 feet when on the proper
glidepath). Contributor 2: Pulling the thrust levers off at 50 ft accomplishes two important functions. First, if you leave the thrust levers in the climb detent and get slow during the round out and flare, the power will come in to
compensate just when you are trying to land!!! This, of course, extends your landing distance which could be critical at certain airports and runway conditions. The system acts this way because you are in the "speed" mode at 50 ft and the speed selected on the FCU is what the computer will try to maintain until you disconnect the
Autothrust. Second, the thrust levers MUST be at idle during touch down or you will not get the spoilers to deploy after
landing ... also extending your landing roll distance. So the golden rule is that you must be at idle on touchdown. Contributor 3: TO IDLE, OR NOT TO IDLE, THAT IS THE QUESTION
Contributor 4: A good and totally "unofficial" technique for retarding the thrust levers to idle during the landing flare is to begin to retard the thrust levers at 50 feet for the 319, 40 feet for the 320 and 30 feet for the 321. Obviously there will always be additional circumstances to consider (wind, temp, weight, field elevation, etc.), but this is a terrific starting point that works well for the majority of situations and will put you in the ball park. This technique will help to prevent long floats on short runways or planting a heavy airplane on a hot day. Just remember 50-40-30 for the 319-320-321! |
| Technique: Miscellaneous ... Contributor: Anonymous |
|
* When managed speed is not what you think it should be when you get to altitude, or when OPT ALT or REC MAX don't make sense for your weight/OAT, just re-enter the same COST INDEX. It forces all FMS functions concerning performance to be recalculated. It also senses OAT again to assist in that math. I do this practically every flight after reaching cruise altitude. * 74 degrees F seems to be the ideal temp for the cabin zones as read from the lower system display. * For those taking a short nap while in groundschool: the entire rudder trim panel is INOP when you are on autopilot. * Off your altitude hand flying? That loud buzzing sound can be silenced by pressing the MASTER WARN pb directly in front of your nose on the glareshield. Why is it so many pilots have to use the EMER CANCEL pb? * A study in time and motion: When starting the APU with a bleed air requirement, bring up your finger to the APU panel. Press and release the master switch. Press and hold the start switch till it illuminates (3 seconds). Press the APU Bleed switch. Hand down. * History Winds: What a kewl feature. I use 'em. Most likely better wind info than SABRE winds for the first portion of flight. Just understand that this is assuming that you will be flying into the same basic airspace that the airplane just came from. Not good for an RON airplane. |
| Technique: Descent Planning ... Contributor: Anonymous |
|
Without consulting more intelligence, I'll give you my perspective. The descent phase automatically begins 200nm from destination, coincident with the ENTER DEST DATA on the scratch pad. If you begin a descent prior to that, you of course will get the NEW CRUISE ALT=31000 message, indicating that 31000 has been plugged in, and will be annunciated on the PROG page. Also, when reaching that new cruise altitude, the "soft cruise" starts again. Inside that mileage, none of this happens since you have entered the descent phase. Notwithstanding that, you can enter a descent constraint at ANY time, which will generated a white hockey stick for the preferred T/D point, then when you actually start down in a managed mode, the lightning bolt appears. A lightning bolt will not appear in OPEN DESCENT, but the blue hockey stick will indicate where you will level off. Lastly, when you change from a managed mode into a V/S mode or an open descent, a once magenta circle around any constrained waypoint will turn white, as if to say "caution ... I have no control". Lastly, if that circle changes to amber, and MORE DRAG appears on the PFD, the FMGC is telling you that it cannot make the constraint with idle and 1/2 speed brakes. Some folks don't know that. A common belief is that making a constraint is based on idle thrust only. Some additional factors to consider: A failure to enter the arrival/descent Waypoint winds can have a major impact on descent planning ESPECIALLY if your descent involves descending from a strong headwind into a much lesser headwind (or even a tailwind) in a short distance. The FMGC goes crazy re-computing everything and can even start computations all over. This winter near Pittsburgh, the winds were 260/30 at FL180, then they were 260/115 at FL210. No FMGC can guide a profile with that kind of change, UNLESS you tell it in advance. It will do a good job adjusting to wind velocity changes that are reasonable and normally anticipated, hence the 40 knot bracket. Remember, it interpolates winds between pilot entered values. If no values are entered, it interpolates between existing winds and zero wind on the surface. So if it can't make constraints, it knows the pilot will have to pay the fine and it goes back into saving fuel. Come to think of it, if the atmosphere in which we fly were void of wind and obscuring phenomena, there would be no reason to have Pilots. Or cockpits. All RPV's.
|
| Technique: Airbus Rudder Pedals/Brakes ... Contributor: Captain Jim Allen |
|
The Airbus rudder pedals do not have a heel plate/foot arch lock method of gauging where your feet are. In fact, the bottom of the pedals just sort of end clean a couple inches above the floor. Therefore, a problem can and will develop if you have one foot more elevated (higher on a pedal) than the other one when landing. Especially if the pilot has smaller feet.
I once landed with a new Captain on 18R in
CLT, the first IOE landing. With all this Captains might, the Captain attempted braking,
claiming one side wasn't working. The new Captain was actually applying full left
rudder and partial right brake, as evidenced by the immediate overheat
on the right brake as we cleared the runway. This was caused by the
right foot higher than the left. Another F/O pushed as hard as he
could, claiming no brakes. I intervened with normal braking, and
discovered both his heels near the floor, a habit of his last jet.
So how did he get through simulator training? Probably using the
autobrake most of the time...as we do.
In tests, I have concluded that the
difference of less than one inch in foot elevation is very significant.
Remember the pedals have a fulcrum point,
below which is rudder input and above which is brake input (duh).
Pressing against this fulcrum is NOT brakes...it's rudder only. Further,
if the ball of the foot (the pressing surface of the foot) is applying
pressure just one inch above the fulcrum, braking is NIL. If a pilot
just plants their feet inconsistently "just anywhere" on the
pedals, they will experience inconsistent braking and may not have full
braking authority, again especially with small feet. Or in the case of
one foot higher, some real asymmetrical techniques are put into play as
one pedal decelerates the plane while the other pedal counters
for directional control. The proof of all this is by looking at the
brake temps on the wheel page a few minutes after landing. If one is
considerably hotter than the other, most likely one brake was used
more.
For gauging, Airbus has designed TOE
STOPS at the very top of the pedals. If the pilot learns to slide their
feet up to those stops...somewhere on short final, braking is much more
effective, predictable, and consistent each landing, resulting
in far greater control. Additionally, if both brakes are used equally,
chances are that a hot brakes ECAM will not appear. Remember to keep all
brakes warm.....250-300 is great for long life.
Try it sometime...you'll love it.
|
Technique: Airbus Trivia Tidbits ... Contributor: Captain Jim Allen |
* You can't hear the engines running on the ground at idle, which may be the BEST reason to accomplish the parking checklist in a timely manner. * Since this aircraft has more than enough horsepower to do the job, I encourage SMOOTH AND DELIBERATE thrust lever movements, so long as they are IAW Pilot's Handbook guidance. This is especially true when switching from TOGA/FLEX to the CL detent after takeoff. If that movement from detent to detent is quick, and there is a large change of thrust, you WILL frighten everyone on board. Be smooth!
|
| Technique: V1 Cut Pitch Control ... Contributor: Bob Sanford |
During my initial simulator V1 cut training, I was having trouble keeping the aircraft heading straight out after liftoff. I realized I was inducing roll into the problem by just the slightest amount of lateral sidestick pressure. To prevent this I held the sidestick at the very base of the assembly, and found I could increase pitch without inducing roll input as the stick was moved aft. Remember to initially rotate to just slightly above 10 degrees pitch, then let go of the stick.
|
Technique: Proper Seat Adjustment ... Contributor: Captain Jim Allen |
Those "other" airplanes....remember how long it took to find your sweet spot with your seat? It used to take me about 3 legs to finally get it just right, then it was either the end of the day or a ship change. Well no more! The Airbus has got to be the best ergonomically designed flying machine going. It's like having a Barclay-Lounger E-Z chair in the cockpit! But you do have to make a few adjustments to make it just right for you. It took some trial and error at altitude to get it right, but that few minutes spent finding "comfort by the numbers" now saves me tons of time trying to find that ol' sweet spot. Here's how: 1. Seat cushion fore/aft and elevation: This is the heart of it all. You have to set the cushion so that you "officially" cover the distant white ball with the near red ball on the windscreen post. (cat 3 stuff). That translates into being able to look exactly right through the CENTER of your front window. Further defined, in a comfortable relaxed seated position, with your recline set to about 10 degrees back, you should just be able to see the top of your PFD/ND glass and... with a very slight head rise, look down the top of the glareshield. Once you have located this cushion position, note the relationship of the cushion's electric switches to the center pedestal. Memorize that relationship. (hint: use the offset on the pedestal as an imaginary pointer toward the seat cushion) 2. Recline/Headrest: Again, about 10 degrees back, and set your headrest for comfort. 3. Rudder pedals: Set them to a number that allows full rudder travel and maximum braking (toes touching the toe plates) without skootching in the seat. Learn the number. 4. Outboard armrest: (Real important) Remember, one adjuster controls the "elevation" of the entire platform, and the other adjuster controls the "rear pivot" of the platform. Sit up straight (shoulders parallel with the artificial horizon and/or the floor) and adjust the platform elevation until your elbow is comfortably supported, then adjust the pivot so that your lower arm aims at the sidestick with a straight wrist. Of course some forearms look like Popeye's and some look like Olive Oyl's, so fine tune. And for those that prefer NOT to use the outboard armrest? I'll put my family on the next flight, thank you. This is wrist flying, not upper body flying. Learn the letter and number (I am an F-6 kind of guy). 5. Inboard armrest: No lower than parallel to the outboard. 6. Lumbar support: There are two, one adjusts fore/aft lumbar support and one does up/down lumbar support. Set to your spine's delight, especially for the long ride. One last thing....before you get all seated and buckled up, make sure your headset is plugged in, because it's hard to reach from your seat. With both pilots properly adjusted, a jumpseater would view two heads at the same height. They would have very little body movement to look out the front window or down at the glass. When flying, (hand or auto) the instrument scan seldom needs to exceed eye movement range. Flap settings can be verified by looking at the upper system display, not the flap/slat handle. Don't be so low that you have to raise your head like "ET" to see out. All this may sound like overkill, but since you're already on the clock, you might as well be as comfortable as possible. The comfort built into the Airbus speaks volumes when it comes to a long duty day. And the automation is icing on the cake. So fly safe, fly standard, and make yourself comfortable while you're there!
|
Technique: Maintenance Solutions ... Contributor: Carole Litten |
Have cellphone on and available with Maintenance Control A319 PIT desk programmed in phone. Can find this number inside logbook. Once pushed back or at non-maintenance station and you get an ECAM caution not listed in PH 3B, call Maintenance Control PIT. If necessary have F/O coordinate on the phone with Maintenance Control. They will lead you through C/B setting, location and time to allow before resetting c/b and time to allow for that particular computer to reset. Some take 5 minutes before showing they are back working. Have prevented returning to the gate many times using this resource. Also some computers & c/b's may require resetting up to 5 times before the computer is online. Again doing this in coordination with Maintenance Control covers you legally. Also some times after several attempts give the reset tries a break for 20 minutes or so and then try again. THIS IS FOR NON POPPED C/Bs only. This is for ECAM cautions as a result of a computer not coming on line so as to say.
|
| Advice from the old timers ... Contributor: Captain Cook |
"Keep the aeroplane in such an attitude that the air pressure is directly in the pilot's face." - Horatio C. Barber, 1916  "When a flight is proceeding incredibly well, something was forgotten." - Robert Livingston, "Flying The Aeronca" "The only time an aircraft has too much fuel on board is when it is on fire." - Sir Charles Kingsford Smith, sometime before his death in the 1920's "Flexible is much too rigid, in aviation you have to be fluid." - Verne Jobst "If you can't afford to do something right, then be darn sure you can afford to do it wrong." - Charlie Nelson "Just remember, if you crash because of weather your funeral will be held on a sunny day." - Layton A. Bennett "I hope you either take up parachute jumping or stay out of single motored airplanes at night." - Charles A. Lindbergh, to Wiley Post, 1931 "Never fly the 'A' model of anything." - Ed Thompson "Never fly anything that doesn't have the paint worn off the rudder pedals." - Harry Bill "Keep thy airspeed up, lest the earth come from below and smite thee." - William Kershner "When a prang seems inevitable, endeavour to strike the softest, cheapest object in the vicinity, as slowly and gently as possible." - advice given to RAF pilots during W.W.II. "Instrument flying is when your mind gets a grip on the fact that there is vision beyond sight." - U.S. Navy "Approach" magazine circa W.W.II. "Always keep an 'out' in your hip pocket." - Bevo Howard "The Cub is the safest airplane in the world; it can just barely kill you." - attributed to Max Stanley, Northrop test pilot "A pilot who doesn't have any fear probably isn't flying his plane to its maximum." - Jon McBride, astronaut "If you're faced with a forced landing, fly the thing as far into the crash as possible." - Bob Hoover "It occurred to me that if I did not handle the crash correctly, there would be no survivors." - Richard Leakey, after engine failure in a single engine, Nairobi, Africa, 1993. "If an airplane is still in one piece, don't cheat on it. Ride the bastard down." - Ernest K. Gann, advice from the "Old Pelican" "Though I Fly Through The Valley Of Death I Shall Fear No Evil, For I Am At 80,000 feet And Climbing." - Sign over the entrance to the SR-71 operating location on Kadena AB, Okinawa "You've never been lost until you've been lost at Mach 3." - Paul F. Crickmore "The emergencies you train for almost never happen. It's the one you can't train for that kills you." - Ernest K. Gann, advice from the "Old Pelican" "If you want to grow old as a pilot you've got to know when to push it, and when to back off." - Chuck Yeager "Never fly in the same cockpit with someone braver than you." - Richard Herman Jr, in "Firebreak" "There is no reason to fly through a thunderstorm in peacetime." - Sign over Squadron Ops desk at Davis-Monthan AFB, AZ, 1970. "An airplane might disappoint any pilot but it'll never surprise a good one." - Len Morgan "To most people, the sky is the limit. To those who love aviation, the sky is home." "Life is simple. Eat, Sleep, Fly." |